Automatic application deployment
This is the key part of our platform. We’ve done what we can to keep the configuration process as simple as possible. Got any further suggestions how to improve it even more? Please, let us know!
If you want to learn more about the installation process, please go to the “DevOpsBox platform installation” section.
Bitbucket repository
Create a new repository in Bitbucket Cloud. We will call it “simple-app.” Then, clone it to your disk:
Simple application
You will need a simple dockerized application. If you don’t have one, just use nginx – it is enough for our Demo. However, we strongly advise you to create stateless applications that meet 12-factor rules (https://www.12factor.net). While it is not necessary, it is a good practice.
The simple application repository will contain only a single file called Dockerfile containing:
We often use docker-compose to test our applications locally (it is not required, though!). You can do it in a few simple steps:
- Create docker-compose.yaml file with content:
- Start docker-compose:
- Go to http://localhost:8080 in your browser
Box.yaml
This is probably the simplest box.yaml possible. You only specify a port on which your container is listening and a map of environments containing only the names – there are no environment-specific configurations for this application
This is probably the simplest box.yaml possible. You only specify a port on which your container is listening and a map of environments containing only the names – there are no environment-specific configurations for this application
Commit and push Build plan
Next step is to commit your application with the box.yaml and push it to the Bitbucket:
And wait…
Bamboo build and deployment
After some time, 15 minutes max, you will see a new Build plan and a Deployment project in Bamboo.
Build plan


Deployment project
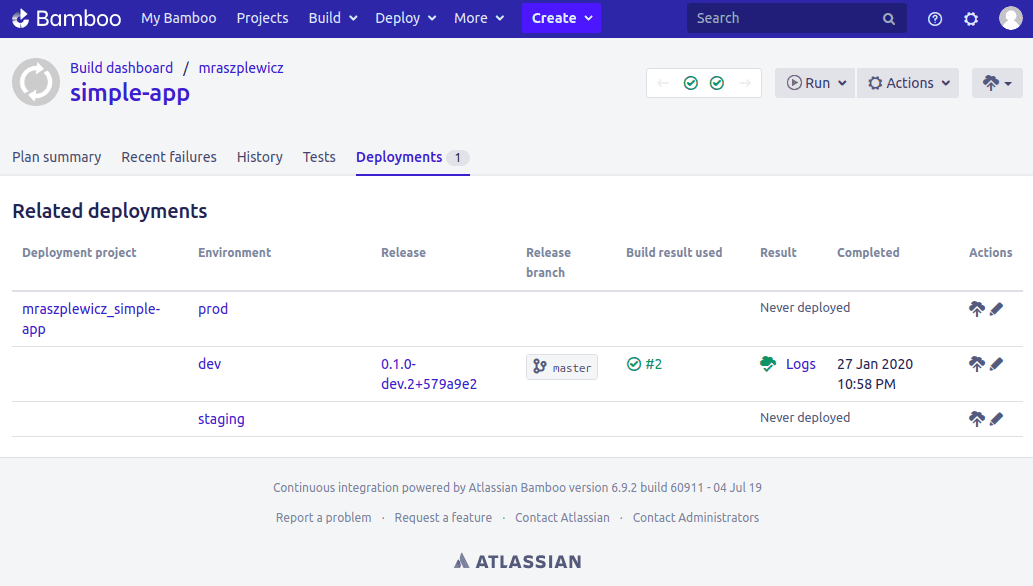
Deployment
Just press the deployment button next to one of environments. Click “Start deployment” and wait until it’d done. There will be a link to your application in the Bamboo deployment log e.g.: “Application url: https://dev-simple-app-dev.nonprod.your-new-test-domain.net”.
You can open it in your browser and see your application running! That’s it! The application is deployed, and you can use all of the DevOpsBox features!
Add Postgresql database
“Ok, great, but that was really simple. I need something more real-life like an application storing its data in Postgresql database.”
Nothing simpler. Just add it to your box.yaml! It will look like this:
When you deploy the application, our platform will automatically create a PostgreSQL RDS instance and inject all the necessary values to your environment variables. Your job is “only” to implement your application!
DevOpsBox platform installation
DevOpsBox installation is quite simple. It takes a few hours, mainly waiting for cloud provisioning. If you trust us and simply want to find out how our platform operates, feel free to skip this chapter and jump back to the “Automatic application deployment” section. If you are really curious, read ahead.
Prerequisites
Scripts
You will need a computer with:
- Bash
- Docker
All other dependencies are dockerized.
Bitbucket Cloud
Currently, the only supported version control system is Bitbucket Cloud. You will need:
- app password with account, repository and project read permissions
- ssh private key of a user with read-only permissions to all your repositories
AWS
- You will need an AWS account. You can use an existing one or create a new one: https://aws.amazon.com/premiumsupport/knowledge-center/create-and-activate-aws-account/
- We strongly advise you to enable MFA for at least the root user: https://docs.aws.amazon.com/IAM/latest/UserGuide/id_credentials_mfa_enable_virtual.html#enable-virt-mfa-for-root
- To run the DevOpsBox installation you will need an access key, you can find instructions here: https://docs.aws.amazon.com/general/latest/gr/managing-aws-access-keys.html
Bamboo
We use Bamboo as CI/CD server. You will need:
- Server id – you can generate one with box-base/platform-tools/atlassian/bamboo/generate-server-id script
- Bamboo license – „Unlimited jobs, Unlimited local agents and 1 remote agents” license should be enough
- SAML Single Sign-On (SSO) Bamboo license (https://marketplace.atlassian.com/apps/1217672/saml-single-sign-on-sso-bamboo?hosting=server&tab=overview) – „1 remote agent Unlimited jobs” license should be enough
Google account single sign-on
You will have to generate client id and client secret for google account. This link can help https://www.keycloak.org/docs/6.0/server_admin/#google. You only need to do the google part, Keycloak will be configured automatically. For authorized redirect URIs enter https://box-keycloak-util.util.your-new-test-domain.net/auth/realms/box-platform/broker/google/endpoint.
Configuration
There are two configuration files:
- aws/box-platform-config/box.yaml
- aws/box-platform-config/secrets.yaml
All the attributes will not be described here; they will probably be adjusted by our engineer. Most of them are self-explanatory, either way.
Box.yaml
Secrets.yaml
Run and wait!
Running the deployment process is as simple as:
You will receive an email with confirmation details for your newly created test domain. After the confirmation, you will have to wait for a few hours. If the process ends successfully, go to: https://box-keycloak-util.util.your-new-test-domain.net/auth/admin/box-platform/console/ and change your boxadmin password.
You now have your own DevOpsBox!